Lab 4: CI/CD Process - Automate Deployment
Overview
In this lab, we will learn how to integrate the deployment with a continous integration and deployment tool. We are going to use Git as a version control system and Jenkins as the continuous integration tool.
We are going to work with the OmniChannel API Implementation.
The completion of this lab will consist of a few steps:
-
Creating a Jenkinsfile and initializing a Git repo
-
Adding the Mule Maven Plugin configuration to the Mule pom.xml file.
-
Creating a Pipeline Jenkins job
-
Creating a post-commit file to automate a Jenkins job process after each git commit
To complete this workshop you need a Jenkins server and git gui. If you run the Lab in the EC2 instance, there is a Jenkins server installed. If you are running in your own machine, you can install Jenkins from here
Be sure to have the following plugins:
-
Blue Ocean
-
Build Pipeline plugin
-
Pipeline
This lab use git as the version controller. If you don’t have git installed on your machine, you can get it from here
Step 1: Setup Jenkins and initialize a Git repo
To get started we need to create a Git repository (Jenkins will be already running). In the following lab we will be using 'Git-Gui' to manage our git operations.
|
The Jenkins will be already running as a service in your virtual machine for this workshop. |
-
Navigate to the Desktop of the VM. Open up the Git Gui application by clicking the icon that looks like the following:
-
Select Create New Repository. Insert the location of your project into the Directory field. If you followed the steps in Lab 1 you may use the following path. Note that if you are using your own project the name of the project may differ:
C:/Users/workshop/AnypointStudio/studio-workspace/omni-channel-api
-
Select the Create button. Your Mule project will be initialized within Git and you will be taken to the Git Gui management console.
-
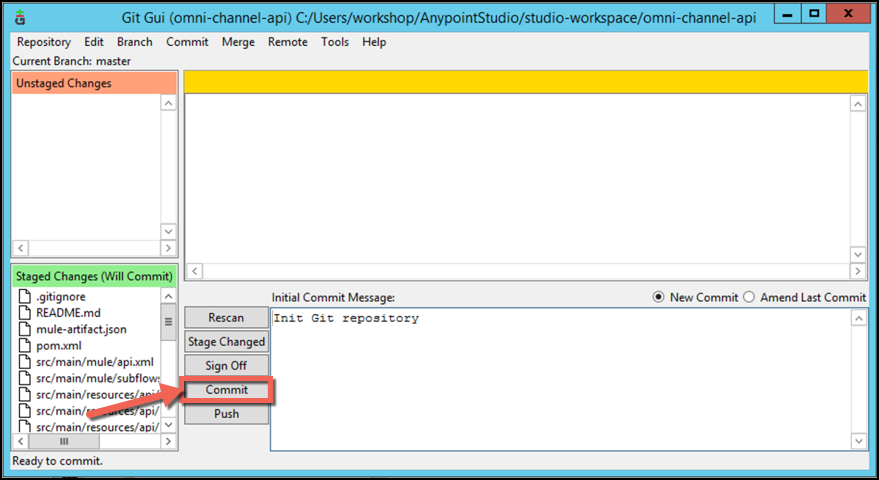
Review the unstaged commits then select the Stage Changed button.

As a good practice we only commit the files needed to be able to successfully make the build. The compiled classes .class files should not be under version control. You could create .gitignore file to let git ignore those files. -
Click Yes if given an additional prompt to stage the untracked files.
-
You will now see the changes moved from Unstaged Changes to Staged Changes. Enter your commit message to be:
Init Git repository
-
Click the Commit button to commit your project.
Now that you have initialized your Git repository, we are going to configure the Mule Maven Plugin.
Step 2: Configure the Mule Maven plugin
We saw in lab 1 that we can deploy using Studio. We can also export as a Jar file and deploy an application from the Anypoint Platform UI.
A third option is to use the Mule Maven Plugin. To do that we are going to update the file pom.xml
-
Navigate back to the Package Explorer located on the right-side of your Anypoint Studio IDE. Open up the pom.xml file located in the root directory of the project.
-
Identify the Mule Maven Plugin. Move the cursor inside the <plugin> element. You will add a configuration for your CloudHub deployment on the next step.
-
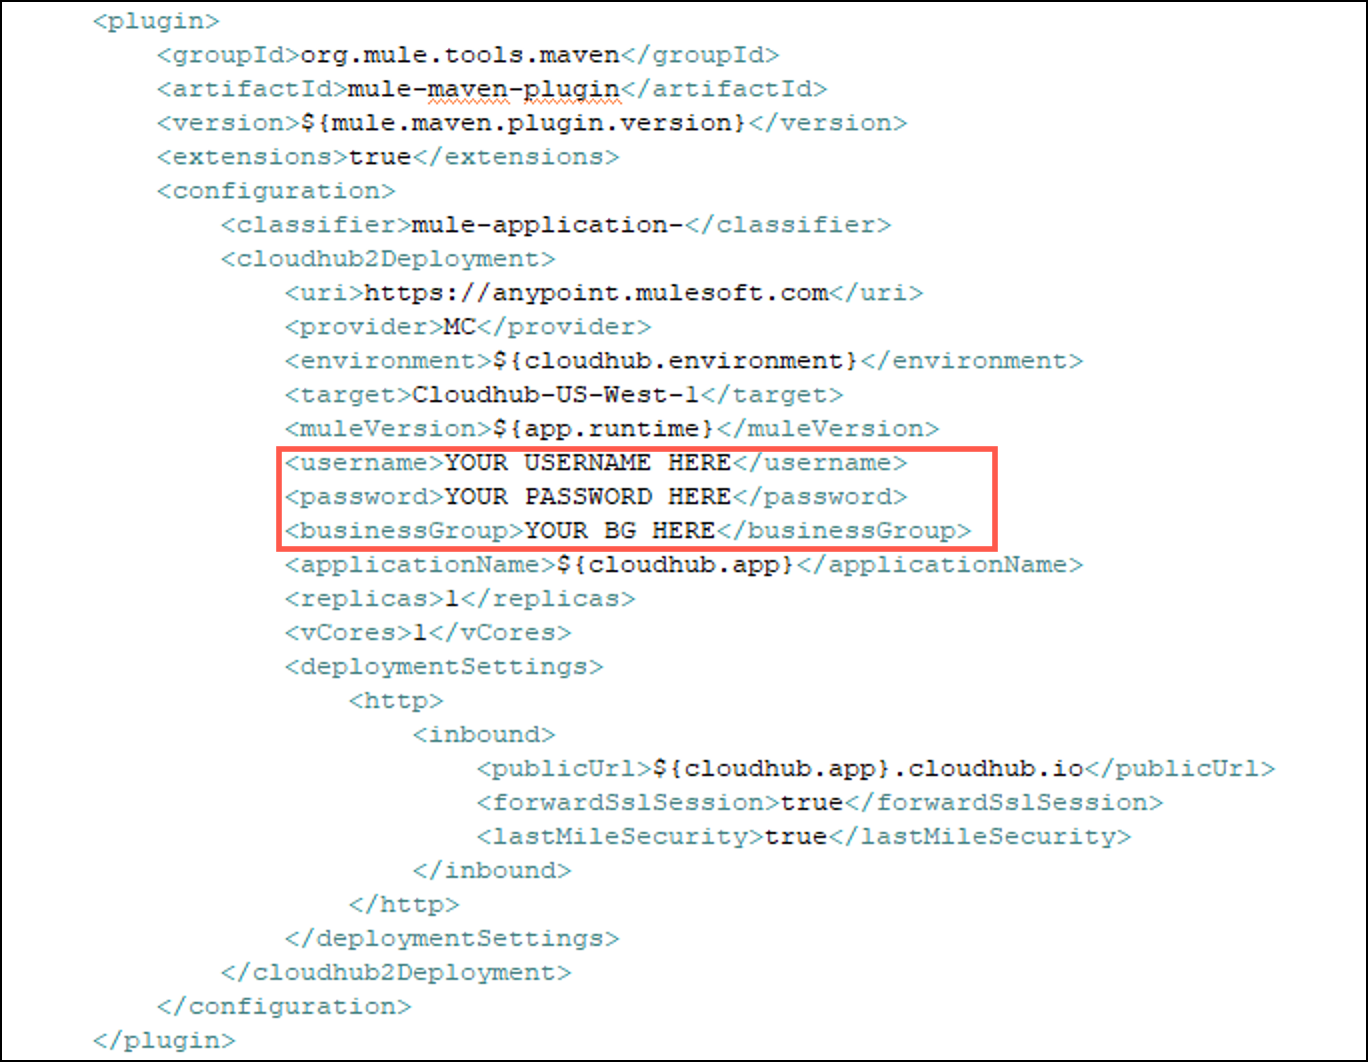
Copy & paste the following xml code on this new line within your <plugin> element:
				<configuration>
					<classifier>mule-application-</classifier>
					<cloudhub2Deployment>
						<uri>https://anypoint.mulesoft.com</uri>
						<provider>MC</provider>
						<environment>${cloudhub.environment}</environment>
						<target>Cloudhub-US-West-1</target>
						<muleVersion>${app.runtime}</muleVersion>
						<username>${anypoint.user}</username>
						<password>${anypoint.password}</password>
						<businessGroup>${cloudhub.bg}</businessGroup>
						<applicationName>${cloudhub.app}</applicationName>
						<replicas>1</replicas>
						<vCores>1</vCores>
						<deploymentSettings>
							<http>
								<inbound>
									<publicUrl>${cloudhub.app}.cloudhub.io</publicUrl>
									<forwardSslSession>true</forwardSslSession>
									<lastMileSecurity>true</lastMileSecurity>
								</inbound>
							</http>
						</deploymentSettings>
					</cloudhub2Deployment>
				</configuration>
You can reformat the XML code to look nicer by right-clicking anywhere on the pom.xml editor canvas and selecting Source > Format. You can see a lot of parameters.
-
target: The target region for your deployment -
muleVersion: It’s the Mule Runtime version. -
usernameandpassword: These are the credentials to deploy into the platform. -
environment: This is the environment were is going to be deployed (Sandbox, Staging) -
applicationName: Name of the Mule application. -
businessGroup: Name of the business group where is going to be deployed. -
workerType: Size of the worker where is going to by deployed.More info can be found here
The plugin configuration should look like this:
These parameters are going to be set later when we run the Maven command.
-
-
#Update your <app.runtime> version to 4.4.0 on line 17
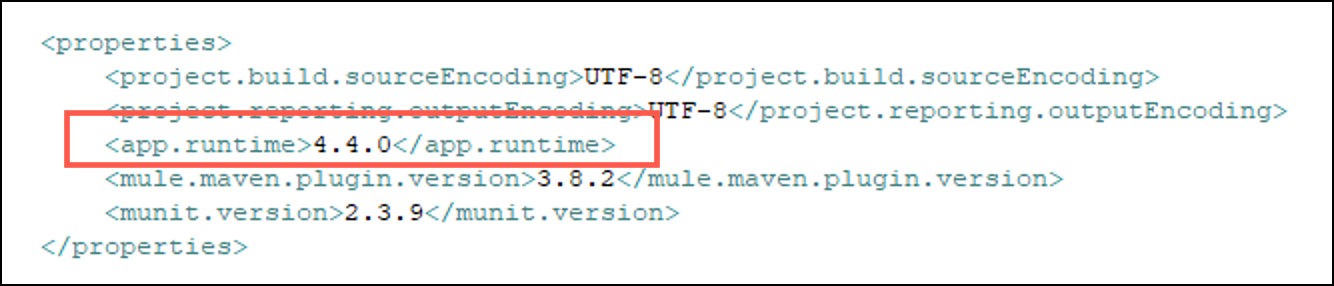
DON’T FORGET TO DO THIS UPDATE IN YOUR POM.XML FILE, OTHERWAY THE JENKINS JOB WILL FAIL
Step 3: Create Maven Settings File
-
Go to the root user folder under
C:\Users\workshop\.m2 -
If you don’t already have a
settings.xmlfile in the folder, create it.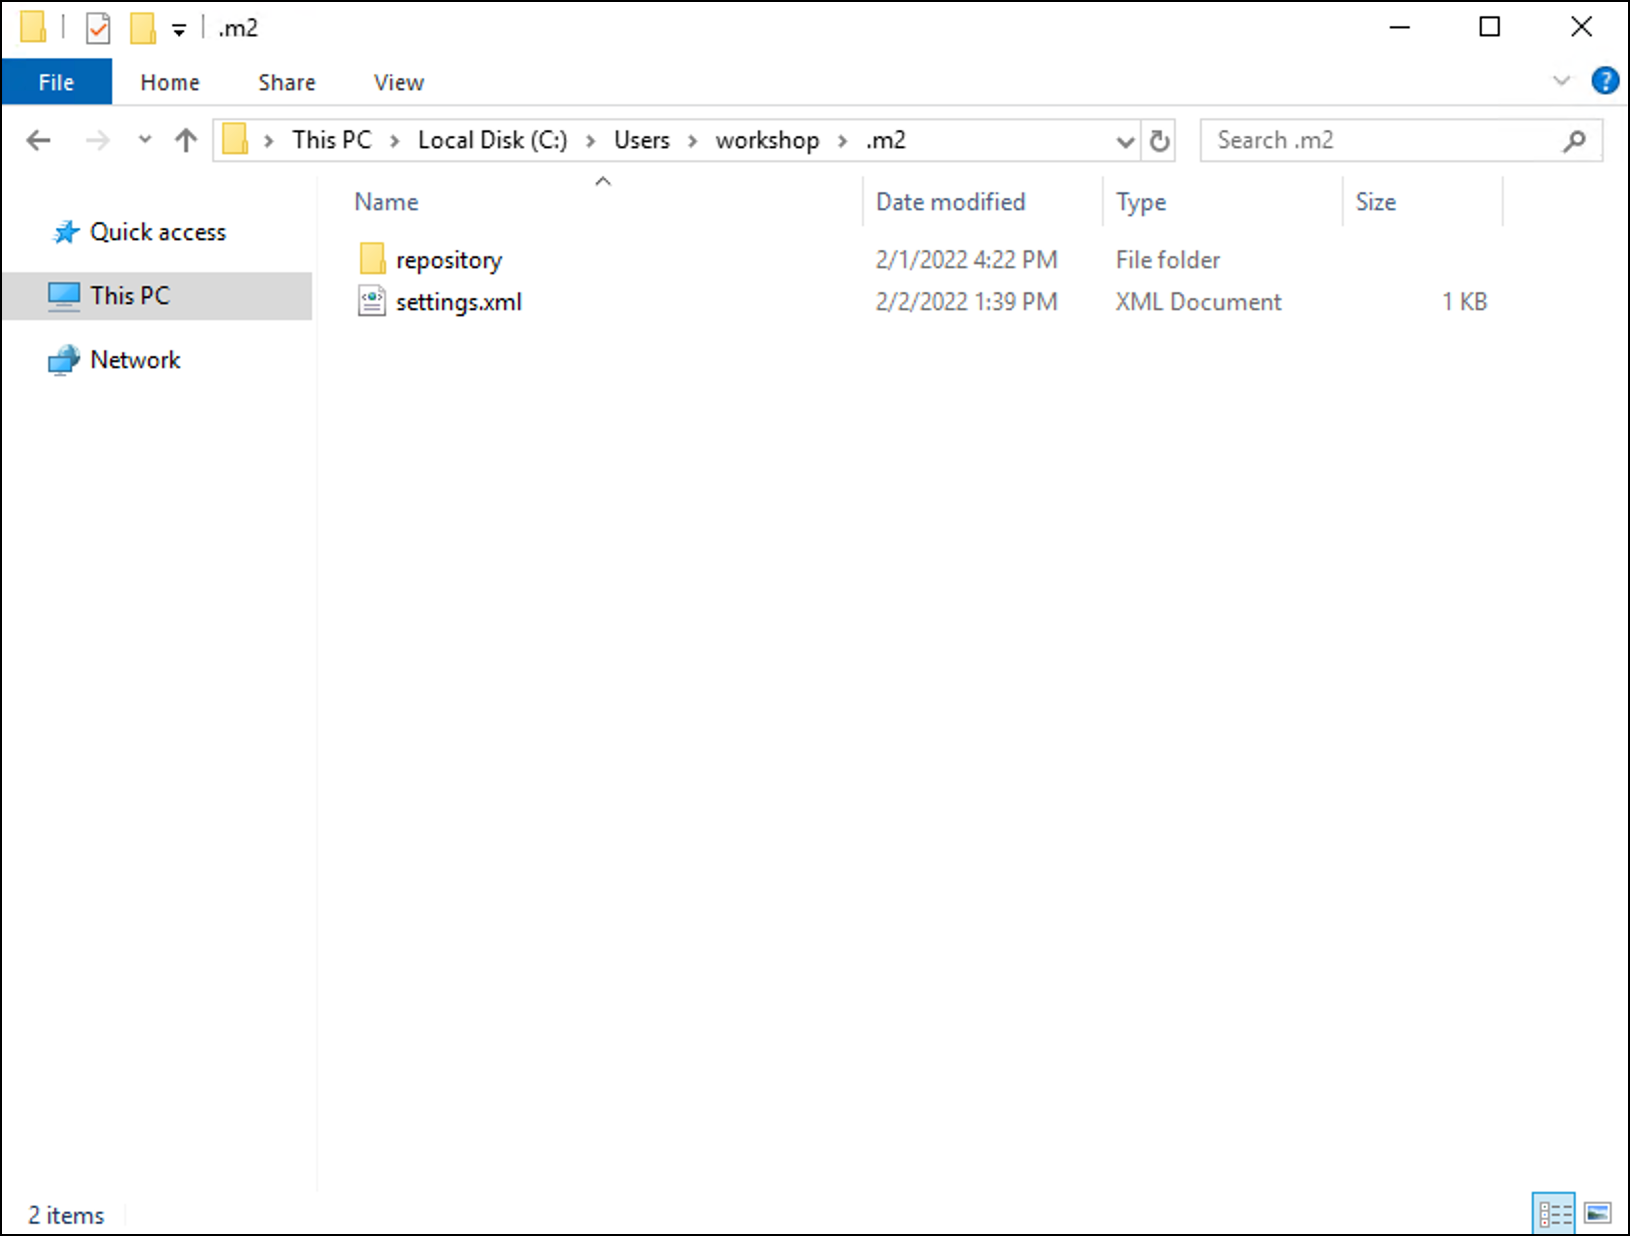
Make sure that the file that you created has the right extention going to viewmenu in the window and thefile name extensionsoption is checked -
Paste the following code inside your settings file and replacen the
${anypoint.name}and${anypoint.password}whith your own platform user and password
<?xml version="1.0" encoding="UTF-8"?>
<settings xmlns="http://maven.apache.org/SETTINGS/1.0.0"
          xmlns:xsi="http://www.w3.org/2001/XMLSchema-instance"
          xsi:schemaLocation="http://maven.apache.org/SETTINGS/1.0.0 http://maven.apache.org/xsd/settings-1.0.0.xsd">
	<servers>
        <server>
          <id>anypoint-exchange-v3</id>
          <username>${anypoint.username}</username>
          <password>${anypoint.password}</password>
        </server>
	</servers>
</settings>
Step 4: Create a Pipeline
Pipelines provides a number of immediate benefits:
-
Code review/iteration on the Pipeline
-
Audit trail for the Pipeline
-
Single source of truth for the Pipeline, which can be viewed and edited by multiple members of the project.
-
On the left side of the window, you will find the Package Explorer. Right click on the root of your project and select New > File.
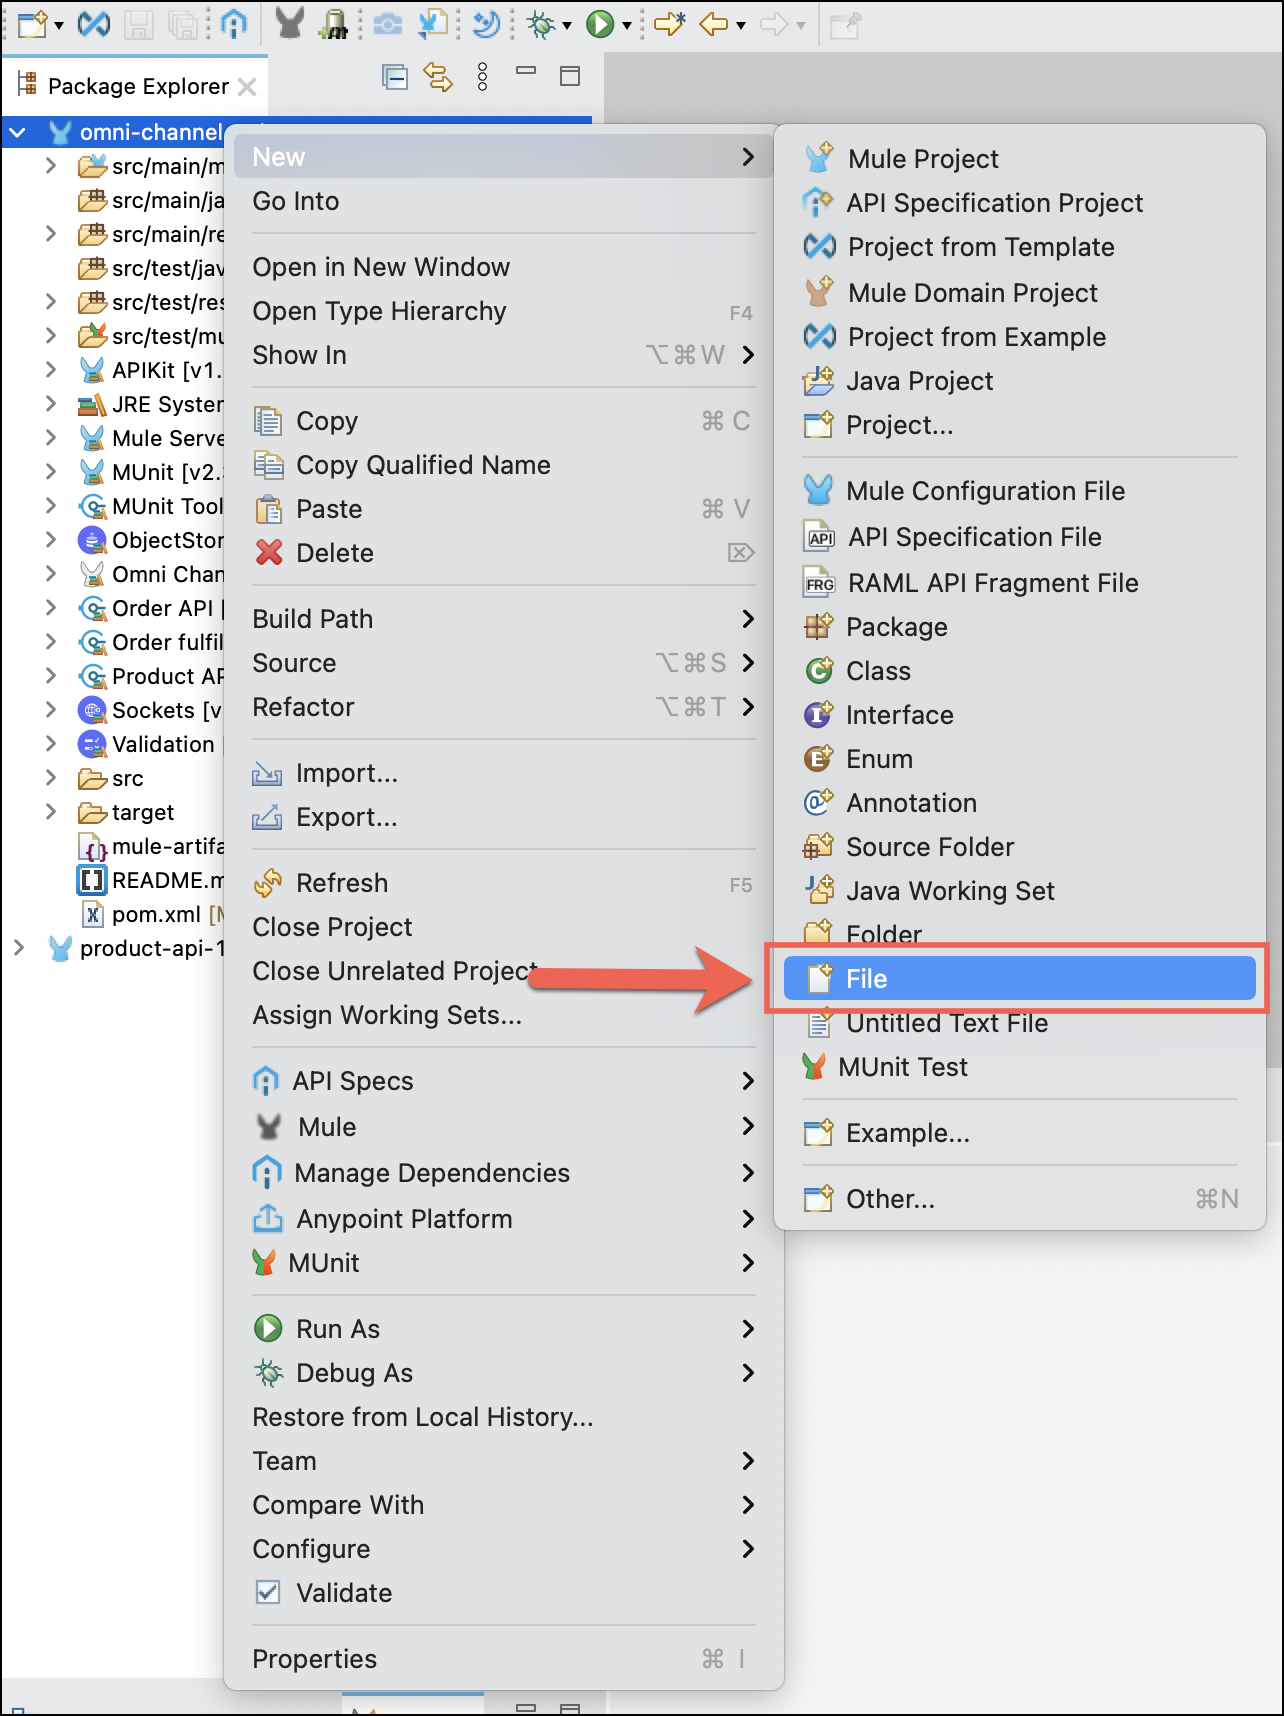
-
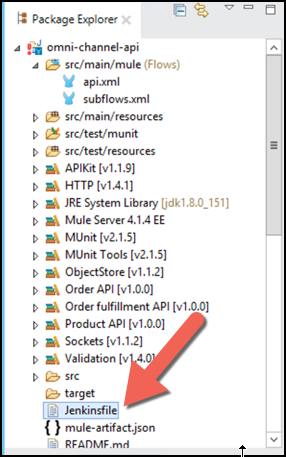
Name the file, Jenkinsfile. Make sure the new file has been created in the root level of the project.
-
Open the new Jenkinsfile. Copy & paste the following script into your Jenkinsfile:
pipeline {

  agent any
  environment {
    //adding a comment for the commit test
    DEPLOY_CREDS = credentials('deploy-anypoint-user')
    MULE_VERSION = '4.4.0'
    BG = "<BUSINESS-GROUP>"
    WORKER = "Micro"
    M2SETTINGS = "C:\\Users\\workshop\\.m2\\settings.xml"
  }
  stages {
    stage('Build') {
      steps {
            bat 'mvn -B -U -e -V clean -gs %M2SETTINGS% -DskipTests package'
      }
    }

    stage('Test') {
      steps {
          bat "mvn test"
      }
    }

     stage('Deploy Sandbox') {
      environment {
        ENVIRONMENT = 'Sandbox'
        APP_NAME = '<SBX-API-NAME>'
      }
      steps {
            bat 'mvn -U -V -e -B -gs %M2SETTINGS% -DskipTests deploy -DmuleDeploy -Dmule.version="%MULE_VERSION%" -Danypoint.username="%DEPLOY_CREDS_USR%" -Danypoint.password="%DEPLOY_CREDS_PSW%" -Dcloudhub.app="%APP_NAME%" -Dcloudhub.environment="%ENVIRONMENT%" -Dcloudhub.bg="%BG%" -Dcloudhub.worker="%WORKER%"'
      }
    }
    stage('Deploy Staging') {
      environment {
        ENVIRONMENT = 'Staging'
        APP_NAME = '<STG-API-NAME>'
      }
      steps {
            bat 'mvn -U -V -e -B -gs %M2SETTINGS% -DskipTests deploy -DmuleDeploy -Dmule.version="%MULE_VERSION%" -Danypoint.username="%DEPLOY_CREDS_USR%" -Danypoint.password="%DEPLOY_CREDS_PSW%" -Dcloudhub.app="%APP_NAME%" -Dcloudhub.environment="%ENVIRONMENT%" -Dcloudhub.bg="%BG%" -Dcloudhub.worker="%WORKER%"'
      }
    }
  }
}
The Jenkinsfile will execute 4 simple steps:
-
Build: We are going to build jar file.
-
Test: We are going to run MUnit tests configured into the project.
-
Deploy to Sandbox: Deploy in the Sandbox environment.
-
Deploy to Staging: Finally if everything goes we well, we are going to deploy to Staging environment.
We won’t explain the Jenkinsfile syntax. More information can be found here Since workstations are windows instances there are syntax differences from linux based such as using bat and not sh.
-
-
Within the Jenkinsfile search for the value <BUSINESS-GROUP>. It will be near the beginning of the file on line 8. Within the quotes, replace this value with the name of your Anypoint Platform business group name.
You can see how the variables declared in the pom.xml file are being replaced when we do the deployment.
-
Scroll down the Jenkinsfile to line 27. Within the quotes, change the value <SBX-API-NAME> to sandbox-omni-channel-api-{initials}. Replace the {initials} with your own initials.
-
Scroll down the Jenkinsfile to line 36. Within the quotes, change the value <STG-API-NAME> to stg-omni-channel-api-{initials}. Replace the {initials} with your own initials.
-
Switch windows back to Git Gui
-
Press Rescan button
-
Stage those Changes
-
Commit them. You can name the commit message as “add Jenkinsfile and update pom.xml”.
-
Step 5: Configure Jenkins
By now your Jenkins server should be started.
-
Open Google Chrome from the Desktop and click the Jenkins bookmark located on the toolbar of the browser. Url should be
http://localhost:8080 -
login with:
-
Username:
workshop -
Password:
Anypoint1357!
-
-
You are now on the Jenkins homepage. We need to configure the Anypoint Platform Credentials. We don’t want them to be part of our code, so we are going to add as Credentials.
On the left-nav section, select "Manage Jenkins” → "Manage Credentials".

-
Under “Stores scoped to Jenkins”, select “Jenkins”. On the next screen, select “Global credentials (unrestricted)”. Finally on the third screen, select “Add Credentials” which is found on the left-navigation column.
-
Enter your Anypoint Platform username and password in the corresponding fields.
-
In the “ID” text field enter: deploy-anypoint-user. This is the ID that must match the ID within your Jenkinsfile in your Mule application on line 6.
-
Select ‘OK’ to finish creating the user.
We recommend to use this practice on sensible credentials like Database Users, Salesforce Users, etc. Now we want to create the Jenkins job for our project.
-
Go back to the Dashboard.
-
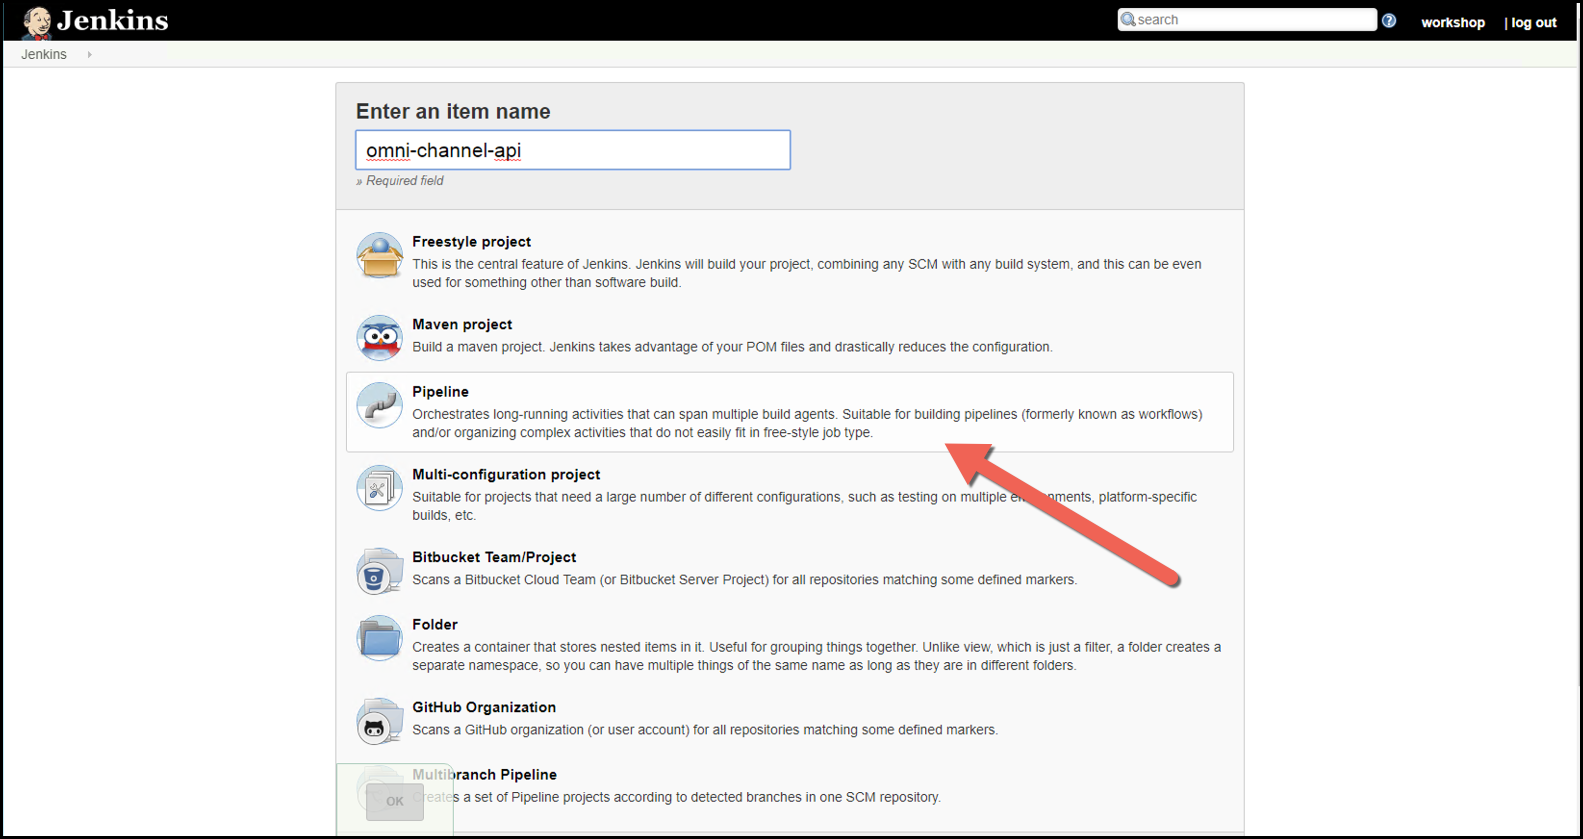
On the Jenkins homepage, select the link titled “Create a job”.
-
On the next screen, under “Enter an item name” enter the name of the pipeline. This can be "omni-channel-api" or something similar. Then choose “Pipeline” and select “OK” on the pop-up window at the bottom left of the screen.
-
Within the Jenkins setup page, scroll to the bottom of the screen to the section labeled “Pipeline”.
-
On the “Definition” dropdown select the option that says “Pipeline script from SCM”.
-
On the “SCM” dropdown select the option that says “Git”.
-
Under “Repositories”, in the “Repository URL” text box enter the path of your repository. Make sure you add the prefix file:// to the directory path. It will look similar to the following:
file://C:/Users/workshop/AnypointStudio/studio-workspace/omni-channel-api

-
Select your created credentials as the credentials for the pipeline
-
Now click “Save” at the bottom of the screen. You will be redirected to the home screen of your build pipeline.
-
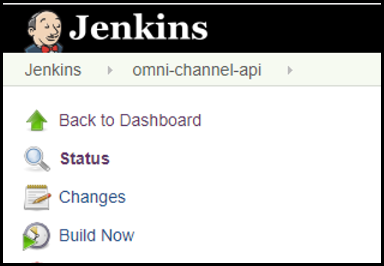
From your current page, click the “Jenkins” nav link at the top-left of the screen. It will look like the following:
-
Click on your Jenkins pipeline link.
-
Single-click on “Build now”. You will soon see the job kickoff and status information will appear. The build pipeline will now build the Mule application, run the unit tests and then deploy the application into the Sandbox environment. After that completes, the pipeline will then run the unit tests and then deploy the application into Staging.
-
As the job is running, you can view the log information by clicking the build number and then clicking “Console Output” on the left-nav column.
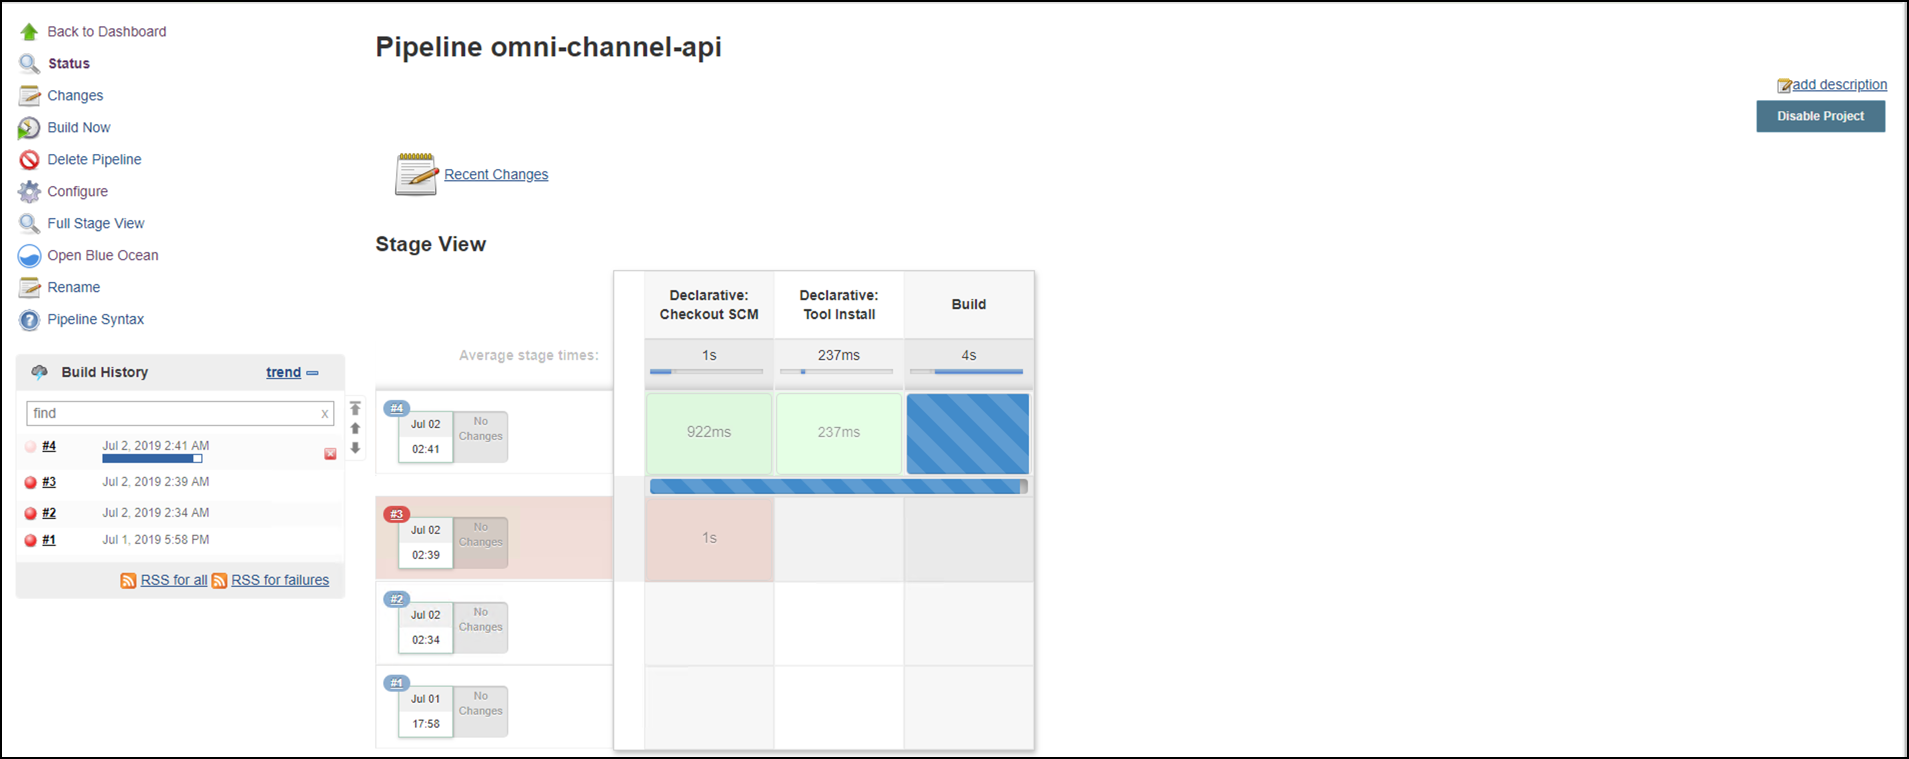 Figure 1. Pipeline Progress view
 -
You can also view a cleaner UI through the Blue Ocean plugin by clicking “Open Blue Ocean” from the job homepage.
-
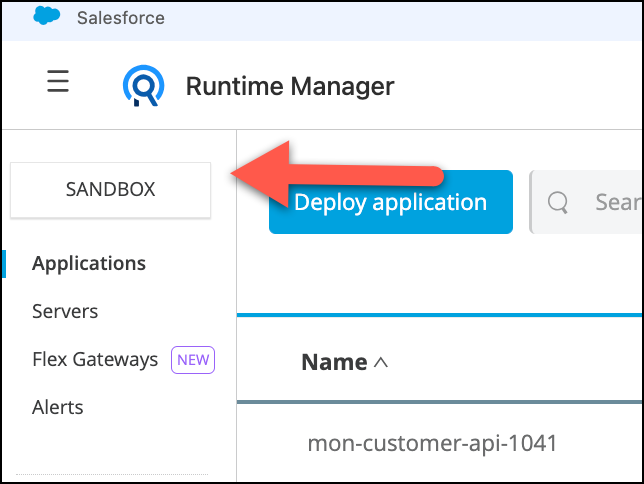
You can also see the Mule applications getting deployed in the Anypoint Studio Runtime Manager by going logging in to https://anypoint.mulesoft.com and navigating to Runtime Manager by clicking the left navigation dropdown.

-
Within Runtime manager you can view both of the applications being deployed in Sandbox and in Staging. You can switch between Sandbox view and Staging view by clicking on the Sandbox rectangle in the left navigation bar within Runtime Manager.

That’s it, the CI/CD process is working and apps are being deployed.
In the next step we are going to automate the building job. So each time there is a change, the build process will start automatically.
Step 6: Automate Git to trigger Jenkins jobs
In our final step, we are going to create a post-commit file within Git so that every time we make a local commit, it will automatically kick off the Jenkins job without any manual intervention. The purpose of this lab is to demonstrate how to set up a fully automated CI/CD process. In staging, you will want to have the jobs kickoff automatically after a Git push rather than just a commit.
-
Within the Windows directory explorer, navigate to the root directory of your Mule application. It will most likely live at this path:
C:/Users/workshop/AnypointStudio/studio-workspace/omni-channel-api
-
Within the Mule application root directory navigate to .git > hooks. Next, create a new file called post-commit. (no file extension)
-
Open the post-commit file with a text editor such as Text Edit by right-clicking on the post-commit file and selecting “Open with” and then selecting Notepad.
-
Copy and paste the following code within the post-commit file then save:
#!/bin/sh set PATH=%PATH%;"C:\Program Files\Git\bin" echo %PATH% sh.exe -x -c "curl 'http://workshop:Anypoint1357!@localhost:8080/job/{BUILD-NAME}/build?token=MULE_WORKSHOP'" -
Make sure to replace {BUILD-NAME} with the name of the project build (i.e. omni-channel-api-workshop)
-
Navigate back to Jenkins management console via Google Chrome web browser.
-
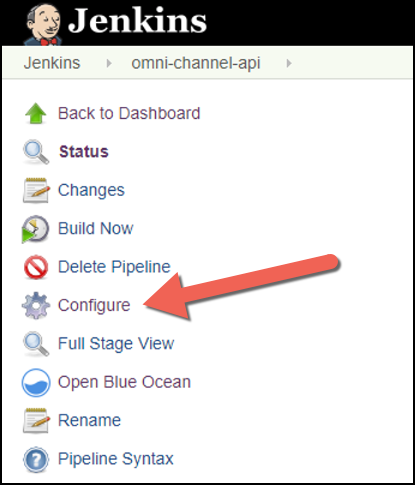
From the Jenkins job project homepage, select Configure from the left-nav menu.
-
Scroll down to the section labeled “Build Triggers”.
-
Select the checkbox for “Trigger builds remotely”.
-
Within the “Authentication Token” text area enter: MULE_WORKSHOP.
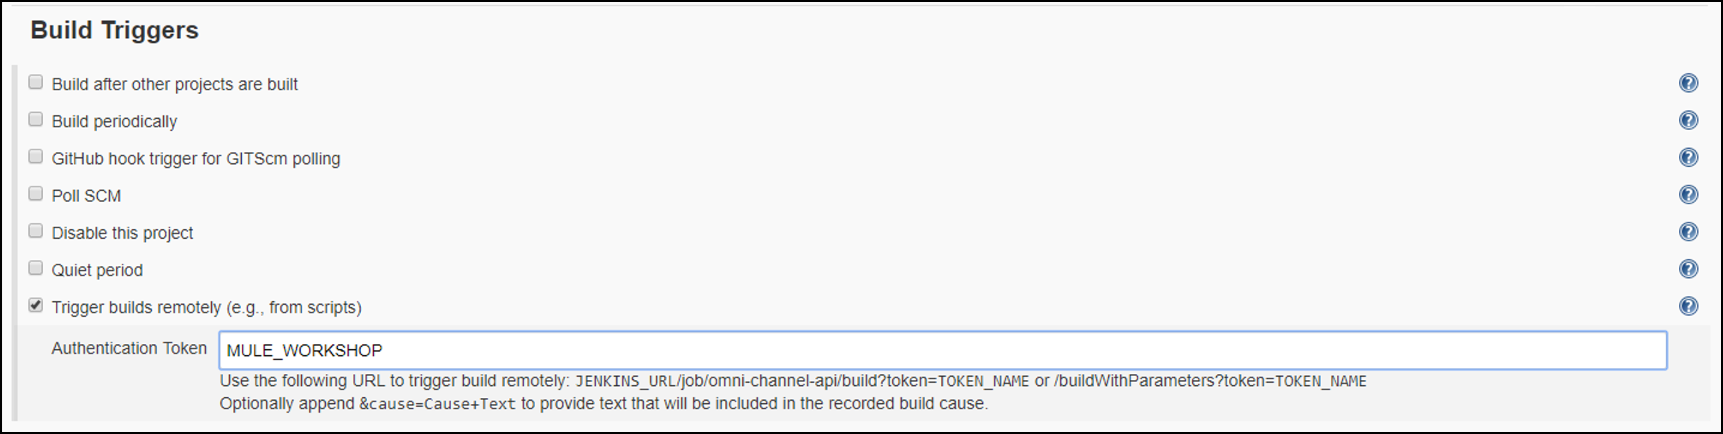
Note that this value matches what we entered in the post-commit script.
-
Within your omni-channel-api project in Anypoint Studio, scroll down to the flow labeled: get:\products\search
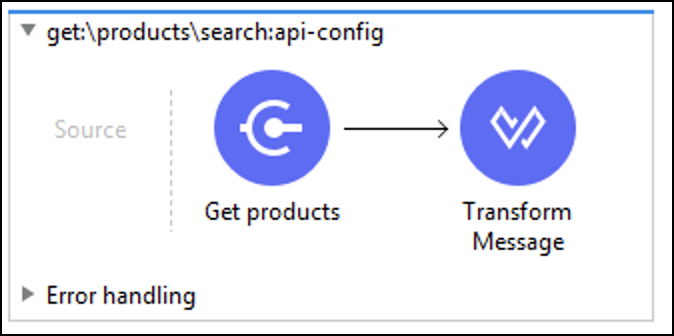
-
Drag in a Logger component from the Mule Palette on the right side of the IDE. Your flow should now look like the following:
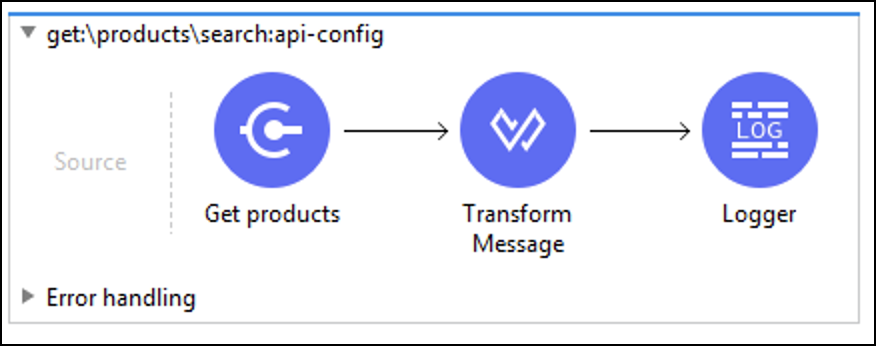
-
Within the Logger component, add some text that you would like logged. (i.e. “Hello from the Mule Workshop!”).
-
Switch to Git Gui. Select Rescan to find the changes to the directory, then Stage Changed to stage the commits. Finally, enter a commit message such as: Added Logger component and click the “Commit” button to commit the changes.
-
After those changes have been committed, the Jenkins job will automatically trigger. If you navigate back to the Jenkins management console in Google Chrome, you can see the status of the build job.
Summary
In this lab, we learned how to configure our Mule applications to be managed by Git for version control and also how Mule fits within a Jenkins CI/CD pipeline. We completed the following steps:
-
Initialized a git repository for our Mule application
-
Created a Jenkinsfile
-
Updated the pom.xml of our Mule application
-
Configured Jenkins
-
Configured git with a post-commit action
-
Committed changes to our Mule application
Which resulted in:
-
Our application running through tests and being deployed to our Sandbox and Staging environments. MULE If you’d like to learn more
-
See Mulesoft Maven Plugin for more information
-
See MUnit for more information
-
Congratulations! You have completed Lab 4, the final lab
Please proceed to next Module